This tutorial will provide you with a step by step process for installing and communicating with your raspberry pi headless (without any monitor, keyboard or mouse connected with your raspberry pi). Though Raspberry Pi comes with a graphics display port and multiple USB ports which can be used to connect keyboard and monitor, I did not not have a spare set of input-output device for my raspberry Pi. All I wanted to do it connect it with my home network and remotely work on it. I hope you find this tutorial useful.
Before we start
List of prerequisites to start this tutorial
Checklist
Network:
1. Home router with extra lan port (to connect raspberry Pi)
2. DHCP server on your home router (Raspberry Pi shall be assigned an IP address from this DHCP server, in most of the cases you wont need to do anything for this)
Hardware:
1. Raspberry Pi
2. Ethernet cable
3. microsd card 8 gb class 4 ( or better)
4. USB power adopter with output of 1.8A, so i suggest a 2A adopter
5. micro usb cable
6. A micro usb adopter (to allow the micro usb card to be inserted in a usb card reader)
7. A USB card reader
8. A windows PC/Mac/Linux PC (However in this howto, we describe the steps from a windows PC)
Optional hardware
1. Raspberry Pi case
Software on windows machine:
1. Win rar (to unzip the downloaded raspbian image)
2. Win32DiskImager (write the downloaded image to the micro sd card)
5. IPscanner (To identify the ip address of your Raspberry Pi)
Optional software:
1. Bittrront. (For faster download of the rasbian image, depending on your Internet connectivity)
Raspberry pi quick start guide, headless installation and access to raspbian on your Raspberry Pi
Installation of the OS
Installation Step 1:
Download the latest raspbian from link with the method of your choice of can do a direct download following this link. You can also download this image using your torrent client for a faster download, using this link, provided you have a torrent client installed on your PC. You can use the following link to install a popular torrent client, Bittrront.
Installation Step 2:
Unzip the downloaded file using Winrar or any other zip program you have available. Keep the unzipped folder and file name handy for our next step.
Installation Step 3:
Install Win32DiskImager, if you haven’t done so. Insert the micro sd card to your PC/card reader using the card adopter if required.
Run the installed Win32DiskImager as an administrator. Browse to the image file location, the one you just unzipped. Select the device, in this case the drive name of the microsd card you just connected with the PC and Click on write.
Writing rasbian image to microsd using win32 disk imager
and your SD card is ready with the rasbian image.
Installation Step 4:
Insert the microsd card to your Raspberry Pi device, connect it to your home router and finally connect the USB power adopter to power it up.
Your raspberry pi installation is completed and ready to be connected remotely/headless
Connectivity of Raspberry Pi
Find the ip address of your Raspberry Pi
Once the Pi is up and running we shall need to discover the IP address from the local network. We can do that easily by running a network scan over the local network. Install the IPscanner tool and follow these steps.
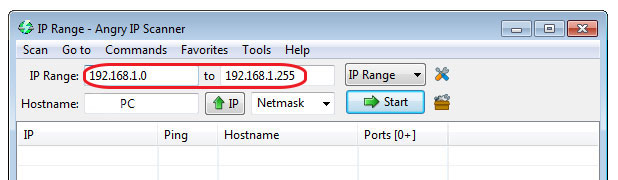
From the IP scanning window it will automatically select the local network range, for scanning. In case it does not you may need to enter is manually. My local network is 192.168.1.0/24, which gives me the ip address range of 192.168.1.0 to 192.168.1.255, which is on my ip address range.
Identifying your Raspberry Pi device IP address using network scanner
Once you start scanning, you shall see a similar input with one hostname raspberrypi.local with the ip address 192.168.1.7 see the following image.
Identifying Raspberry Pi ip address using network scanner
so in this case our discovered ip address for Raspberry Pi is 192.168.1.7
login with ssh:
Once we are done with identifying the IP address of our Paspberry Pi, we can login with ssh to the IP and access the command line interface. This is our first step for establishing the connectivity with our Pi box.
To connect we shall use putty. Download and install putty if you haven’t done so yet.
Open putty, enter the ip address RaspberryPi as discovered on “Scan and find the ip section” into the “hostname area” of putty configuration window. You may save this session by providing a name in the saved session box and click save.
Connecting to Raspberry Pi over ssh with Putty
Once you open the host, it shall ask for a login and a password. The default user to login is “pi” and the password is “raspberry” for the os raspbian, which we are using in this tutorial.
login: pi
password: raspberry
Connecting to Raspberry Pi over ssh with Putty
Change password of the user pi:
Once logged in, Change password to secure your pi box
first enter the current password, followed by entering the new password twice. The system should rerun the message saying “passwd: password updated successfully” as a password change confirmation.
Raspbian graphical desktop of your Pi from a PC or Mac
Open a ssh session with putty on the Pi and run the following commands:
sudo apt-get update
Above command shall update all your system packages
sudo apt-get install tightvncserver
the above command shall install tightvncserver on your Raspberry Pi
this shall prompt you
with
Do you want to continue? [Y/n]
Press "y" to continue
Having installed the VNC server, run it using the command to start the VNC server alone with the first time configuration:
vncserver :1
The first time you run this, you will be prompted to create a new password, This password has to be used every time you connect to the Pi with a vnc client.
To connect to the Pi from a remote computer, you will need to install a VNC client. RealVNC is a popular choice and connects well with realvnc
When you run the realvnc viewer on your Mac or PC, you will be asked to enter the IP address of the VNC server you want to connect to (the IP address of your Pi). followed by the ip address Enter “:1” as we have started the vnc server display number 1. If the IP is 10.0.10.20, the address entered in the VNC viewer should be 192.168.1.7:1
Connecting to Raspberry Pi using VNC viewer
After that you shall be prompted for a password. Enter the password you entered while you started the VNC server, and this shall connect you with your Pi graphical interface
Raspberry Pi connected tightvnc as a server and vnc viewer as a client
Ensure the tightvnc server starts on reboot
cd /home/pi/.config/autostart
nano tightvnc.desktop
Paste the following into the editor window of the file tightvnc.desktop :
As long as your Raspberry Pi is set to automatically log in and boot into the windowing environment, then VNC server will automatically start when you reboot.
Test if the tightvnc starts on reboot
from the shall prompt run the following command
sudo reboot
Once the system is up and running try to re-connect VNC viewer to check.
Congratulations, you have got your Raspberry Pi up and running using Rasbian os headless (without connected display or any input device) and can work on it remotely both text and graphical mode.
Post installation Optional configurations
After the installation is completed you may want to change the following configurations:
Setting up appropriate time zone:
Raspberry Pi has no hardware clock built in. As I understand, it loads time information via ntp server every time it boots. If there is no internet connection, we may need to set the time manually for certain applications to work. Either the way, we shall need to setup timezone for the newly installed system
sudo raspi-config
you shall see a text interface, select (use tab and arrow keys to navigate)
“Internationalisation Options” using arrow key and navigate to select using tab and press enter
Highlight “Change timezone” and enter on select
Select appropriate “geographic area” and enter on ok
To install Raspberry Pi, you shall require a minimum of 4GB memory card. However, if you have installed the system in a larger card(example 8GB or higher), after the installation the maximum available storage shall still be 4 GB. To reclaim all unused space use the following setps:
df -h
Above will display the size of system root pertition
to expand to the unused space, use the following command
sudo raspi-config
you shall see a text interface, select (use tab and arrow keys to navigate)
Select “Expand file system” and press enter.
This shall prompt you with the message saying the “partition table has been altered” ands shall prompt you for a reboot after you exit the raspi-confi. After the reboot run
df -h
The above command output will help you confirm that the unused space has been added to the system root partition.


One thought on “Raspberry Pi a headless quick start guide, (raspbian/howto/tutorial/installation)”