In this tutorial, we shall be using network scanner to identify Raspberry Pis ip address using nmap and angry ip scanner and assign Raspberry Pi a fixed address. If you have configured your Raspberry Pi obtain ip address from DHCP server and would like it to have a static IP address, this tutorial is for you.
Identifying the IP address of your Raspberry Pi
If you are having console access (directly attaching keyboard and screen) to your Raspberry Pi you can skip this step.
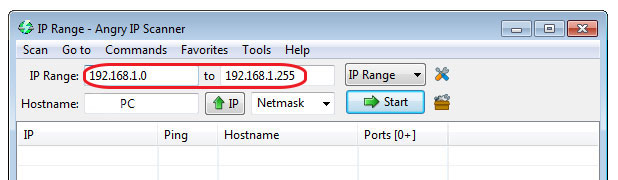
From a windows PC using angry Ip scanner:
Once the Pi is up and running we shall need to discover the IP address from the local network. We can do that easily by running a network scan over the local network. Install the IPscanner tool and follow these steps.

Discovering Raspberry Pi ip address using nmap
The nmap command (Network Mapper) is an open-source network discovery tool, available for Linux, Mac OS, and Windows.
- To install on Linux Debian or ubuntu or Raspbian, install the
nmappackage e.g.apt-get install nmap. - To install on Mac OS or Windows, see the nmap.org download page.
To use nmap to scan the devices on your network, you need to know the subnet you are connected to. First find your own IP address, in other words the one of the computer you’re using to find your Pi’s IP address:
- On Linux (or Mac OS terminal), type
hostname -Iinto a terminal window - On Mac OS, go to
System PreferencesthenNetworkand select your active network connection to view the IP address - On Windows, go to the Control Panel, then under
Network and Sharing Center, clickView network connections, select your active network connection and clickView status of this connectionto view the IP address
Now you have the IP address of your computer, you will scan the whole subnet for other devices. For example, if your IP address is 192.168.1.5, other devices will be at addresses like 192.168.1.2, 192.168.1.3, 192.168.1.4, etc. The notation of this subnet range is 192.168.1.0/24 (this covers 192.168.1.0 to 192.168.1.255).
Now use the nmap command with the -sn flag (ping scan) on the whole subnet range. This may take a few seconds:
nmap -sn 192.168.1.0/24Ping scan just pings all the IP addresses to see if they respond. For each device that responds to the ping, the output shows the hostname and IP address like so:
Starting Nmap 6.40 ( http://nmap.org ) at 2014-03-10 12:46 GMT
Nmap scan report for hpprinter (192.168.1.2)
Host is up (0.00044s latency).
Nmap scan report for Gordons-MBP (192.168.1.4)
Host is up (0.0010s latency).
Nmap scan report for ubuntu (192.168.1.5)
Host is up (0.0010s latency).
Nmap scan report for raspberrypi (192.168.1.7)
Host is up (0.0030s latency).
Nmap done: 256 IP addresses (4 hosts up) scanned in 2.41 seconds
Here you can see a device with hostname raspberrypi has IP address 192.168.1.7.
Using router login page:
If you can login to your router configuration page, you shall also find the ip address of the raspberry pi devices under the attached device section.

2 thoughts on “Discovering IP address on your Raspberry Pi (Raspbian)”