Download Factory image of Nexus 7 2012
To start with you need to find the factory image of “nexus 7 2012 (
wifi)” from https://developers.google.com/android/nexus/images
Install the adb and fastboot tools
Alternatively
If you have difficulty getting the adb tools installed properly on your PC, follow this link
How to install adb tools and android device drivers
Preparing the device for installation (Enable debugging mode on your nexus device)
the next step would be to enable developer mode and usd debugging on your android/nexus device
Setting -> about phone -> Build number; Tap on the build number 7 times to enable developer mode, which will enable developer option under setting
Test the adb tools
C:\ADB-tools>adb.exe devices
List of devices attached
025**c06b25**1h07        device
Start with the downgrading process
- If you have not downloaded the appropriate system image for your device, then now is the time to download and unzip it to a safe directory as mentioned under the section “Download Factory image of Nexus 7 2012”
- Connect your device to your computer over USB.
- Get into the system bootloader of the device by starting the device in fastboot mode with one of the following methods:
- Using the adb tool: With the device powered on, execute:
adb reboot bootloader
- Using a key combo: Turn the device off, then turn it on and immediately hold down the relevant key combination for your device. For example, to put a Nexus 5 (“hammerhead”) into fastboot mode, press and hold Volume Up + Volume Down + Power as the device begins booting up.
- Using the adb tool: With the device powered on, execute:

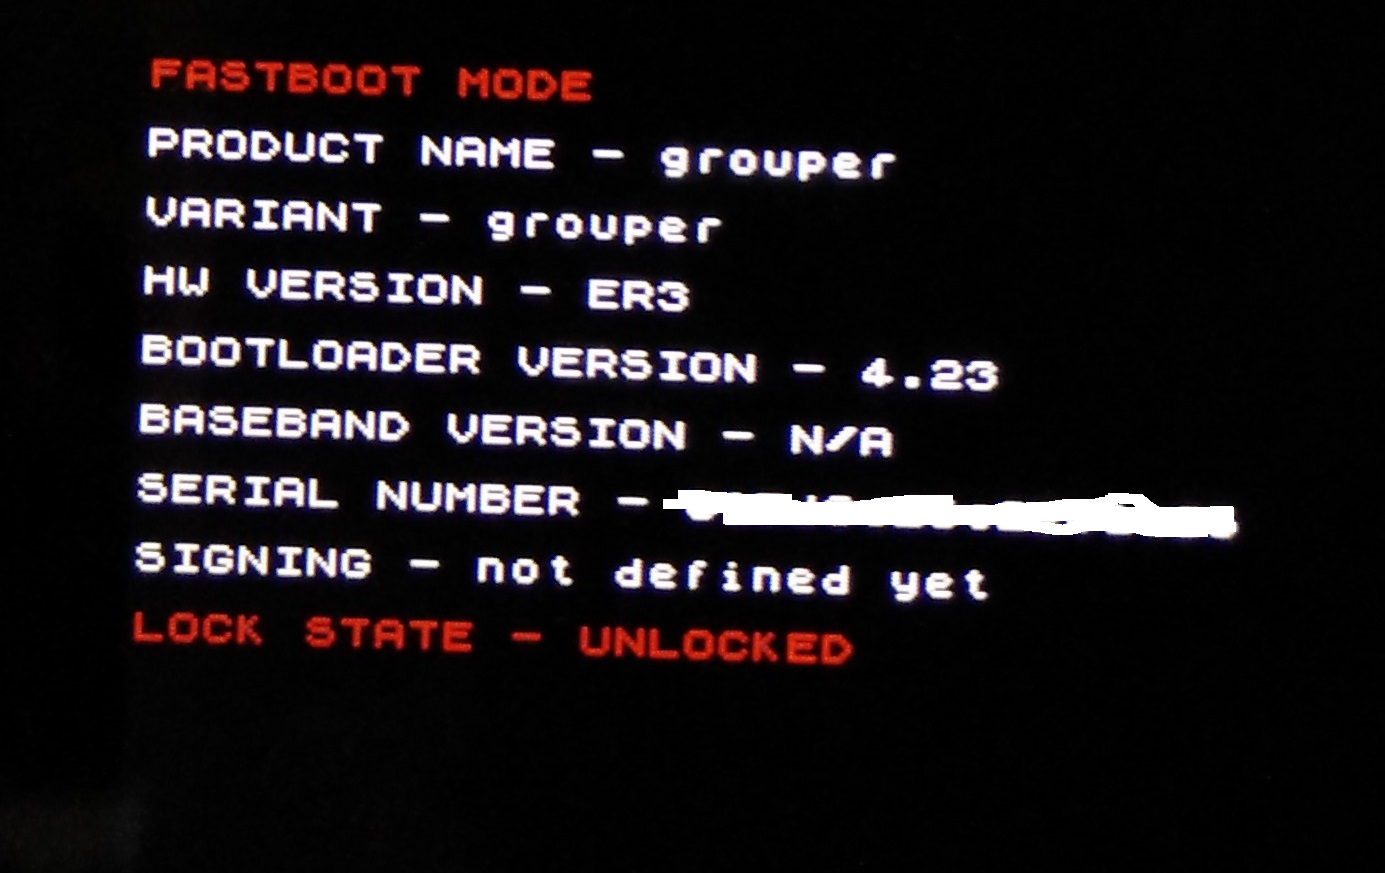
- If necessary (On the bootloader screen if it says “Lock status – Locked”) , unlock the device’s bootloader by running:
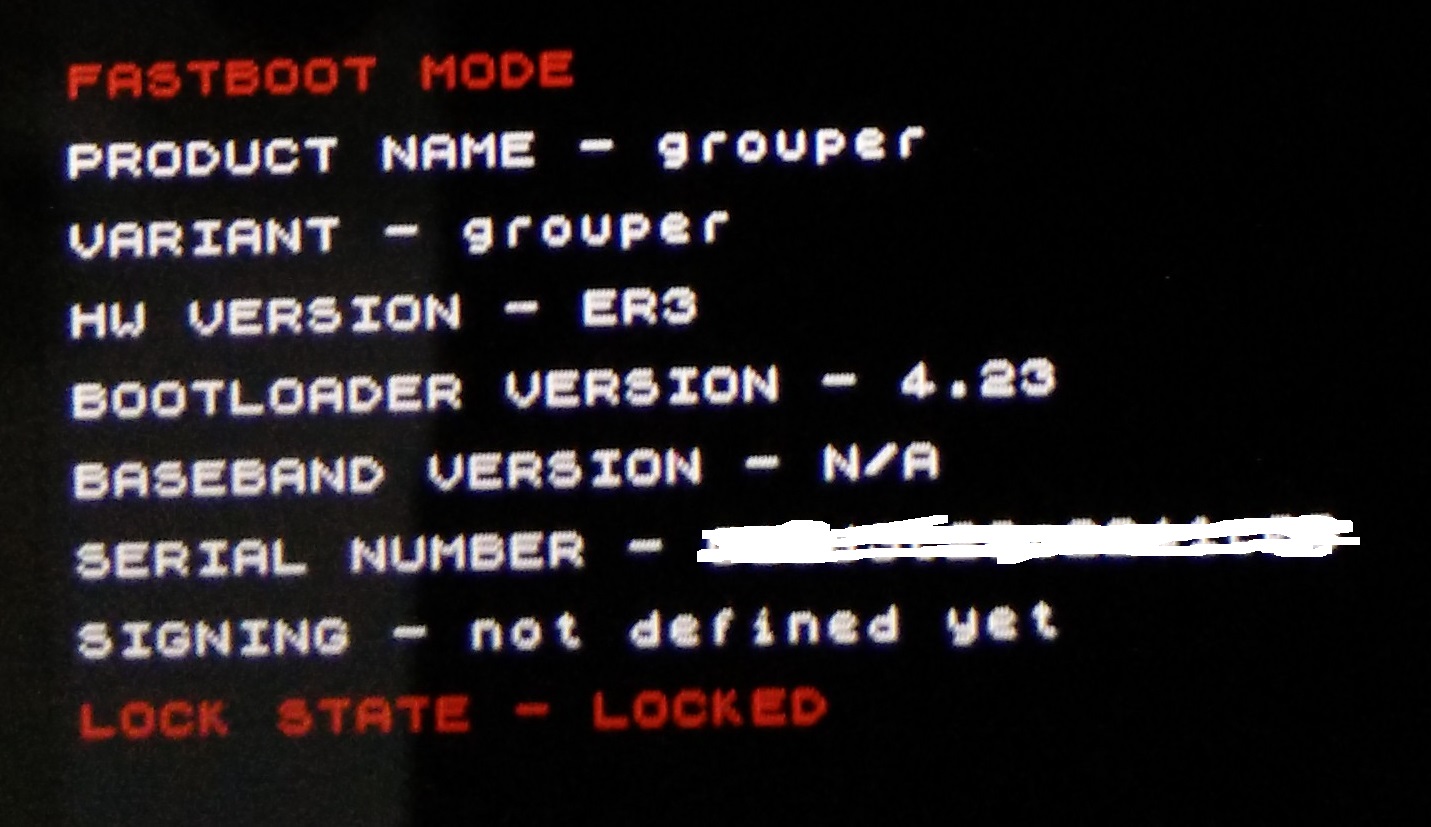
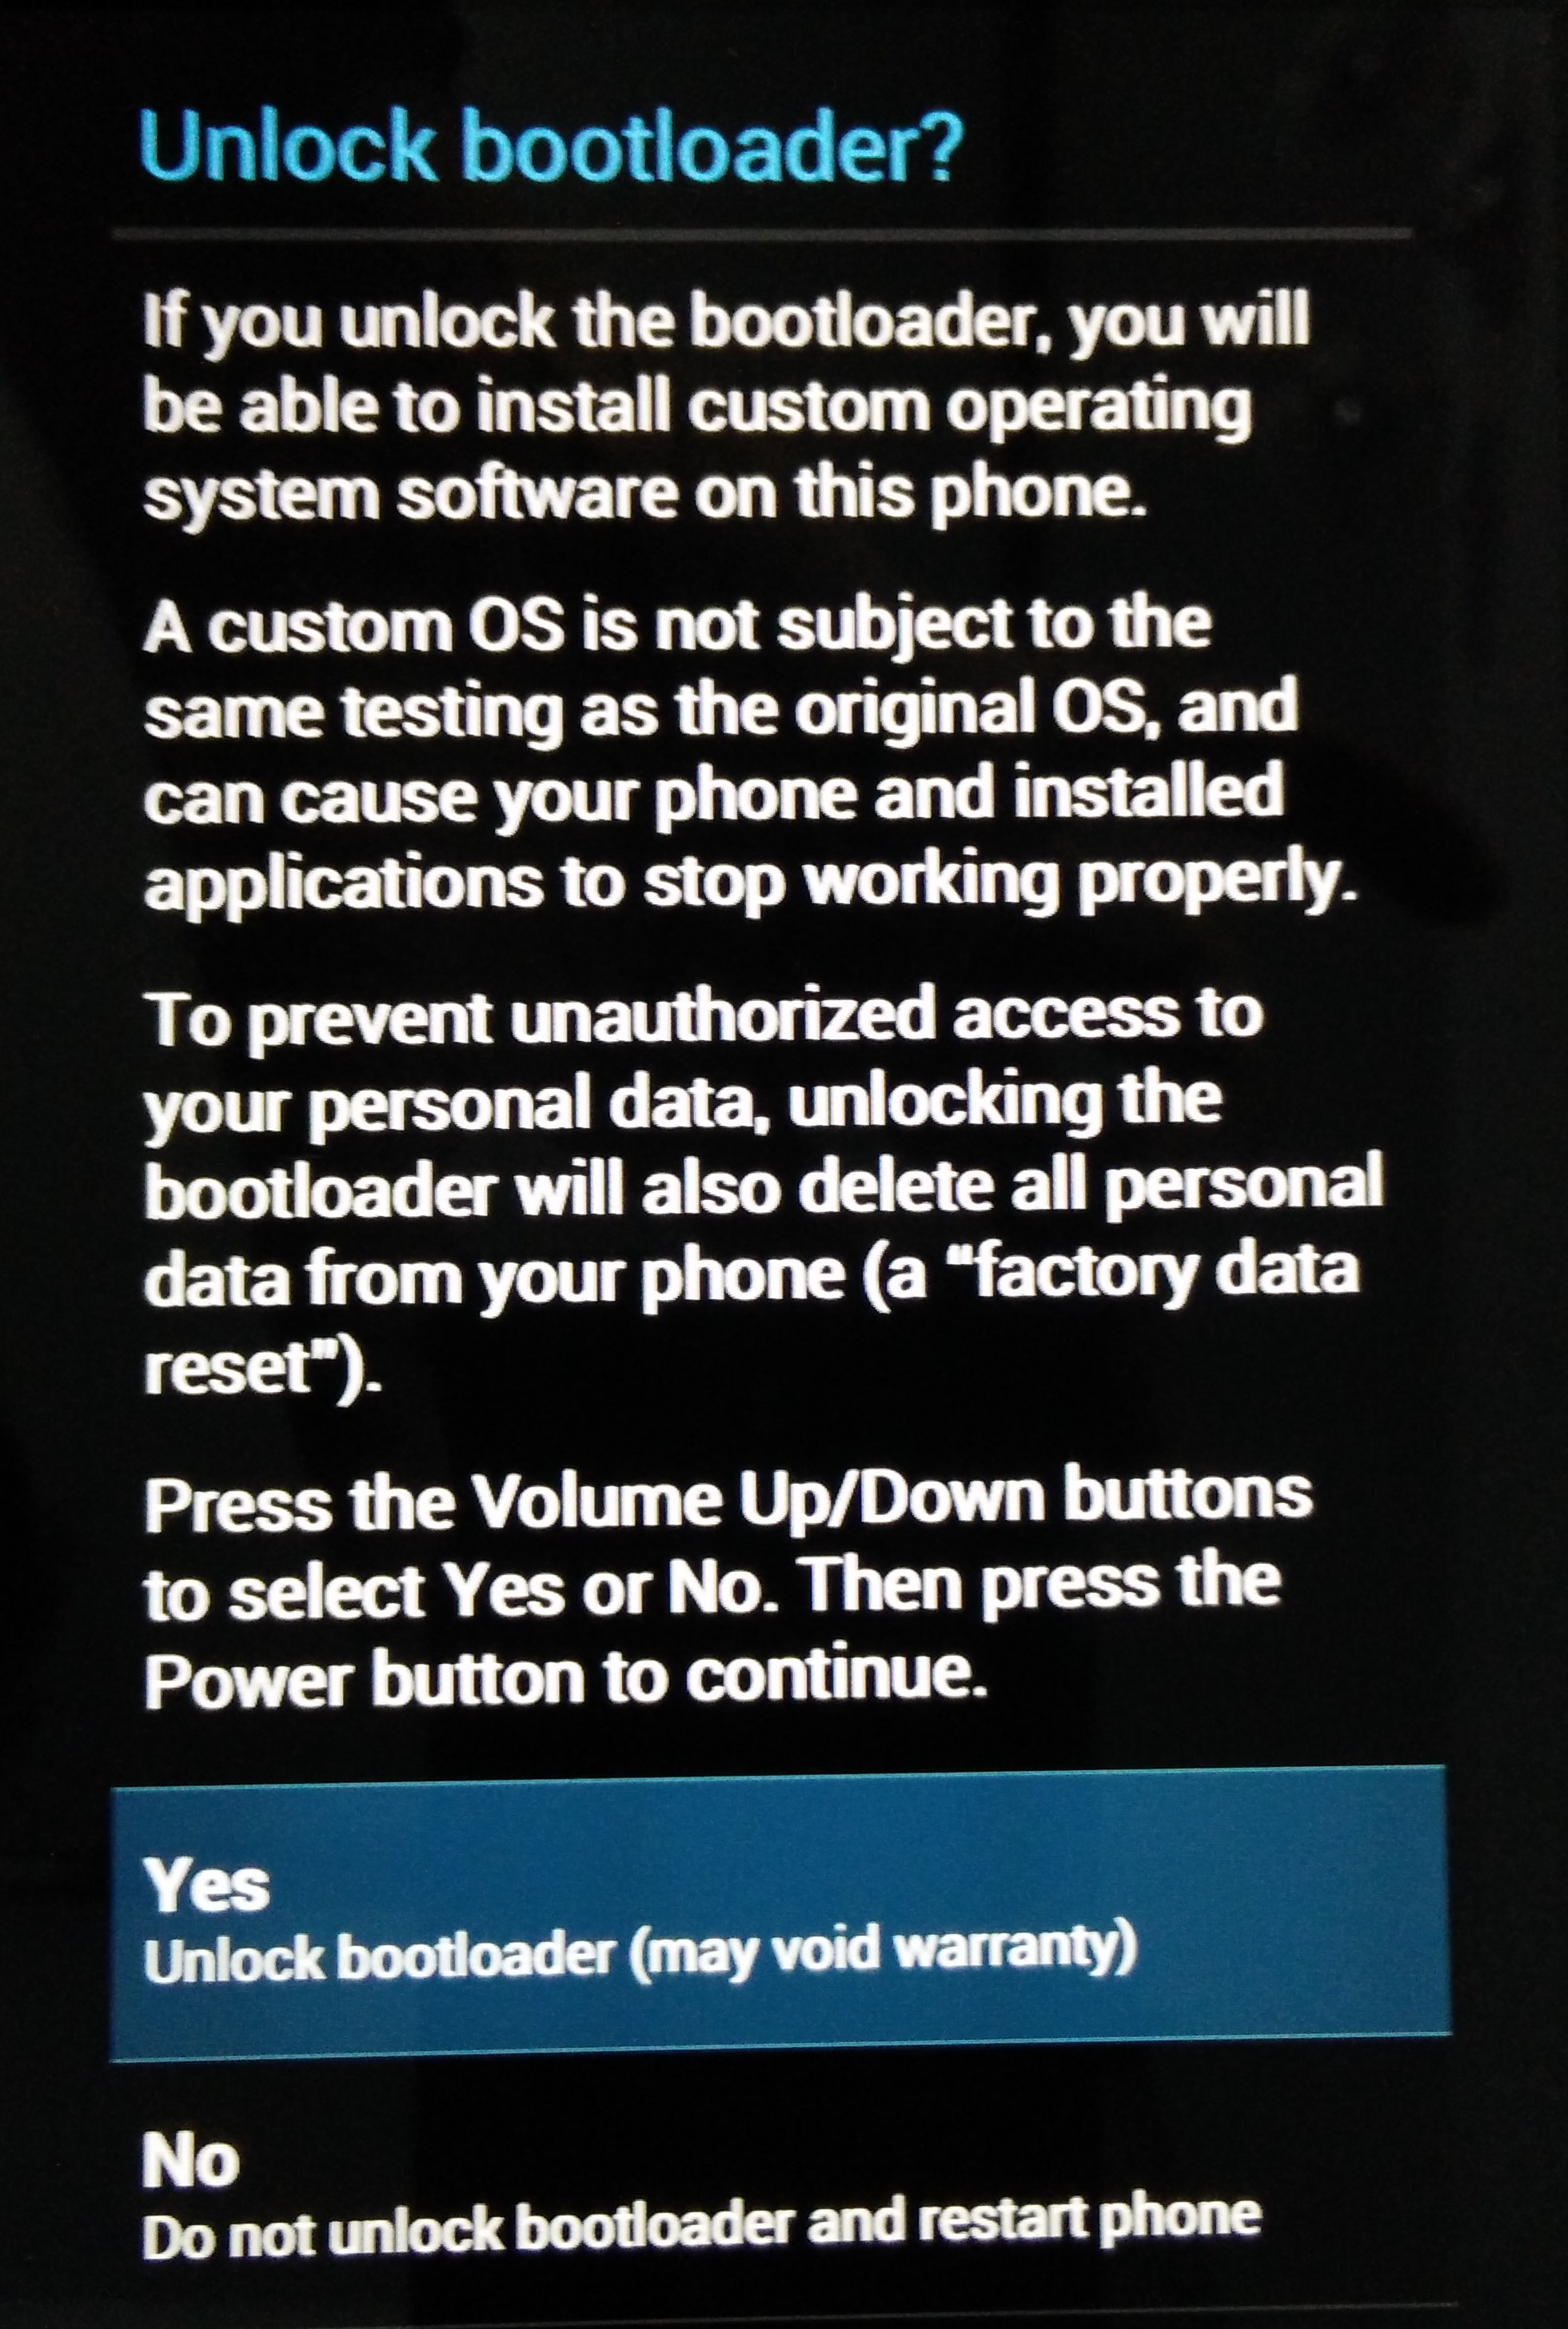
- The target device will show you a confirmation screen. (This erases all data on the target device.)
On your PC this is what you will see
C:\ADB>fastboot oem unlock
...
(bootloader) erasing userdata...
(bootloader) erasing userdata done
(bootloader) erasing cache...
(bootloader) erasing cache done
(bootloader) unlocking...
(bootloader) Bootloader is unlocked now.
OKAY [153.759s]
finished. total time: 153.761s
C:\ADB>
- Open a terminal and navigate to the unzipped system image directory.
- The
flash-all.batis a script that installs the necessary bootloader, baseband firmware(s), and operating system. This file is located at where you unziped the downloaded factory image earlier “Nexus 7 2012”. Edit the flash-all script, if you have installed adb and fastboot tools in a different location. In this case, it is on C:\adb-tools. add the path in the script from “PATH=%PATH%;”%SYSTEMROOT%\System32” to “PATH=%PATH%;”%SYSTEMROOT%\System32″;C:\adb”
I suggest use notepad++ https://notepad-plus-plus.org/download/v6.8.5.html for editing this file. Editing this file with notepad can some time be problematic.
- after making the change save the flash-all.bat file and fun it
Once the script finishes, your device reboots. You should now lock the bootloader for security:
- Start the device in fastboot mode again, as described above.
- Execute:
fastboot oem lock
fastboot oem unlock again, which will wipe the data.In case, the above steps are not working for you ( you have missed a step, executed it wrong, tried something different)
Review the following Steps:
- Ensure you have the adb and fastboot tools installed
- download and unzip the factory image of nexus device
- connect the device with you PC to a USB 2.0 port ( working with USB 3.0 can some times cause you errors)
- Enable developer mode and usb debugging on the device
- use adb devices command (from your adb installation folder) to check the device is detected properly. followed by
- Modify the flash-all.bat file to reflect your adb installation path (where you have the adb.exe and fastboot.exe file located) if required
- Run the flash-all.bat file
- The system should be installed/downgraded after the flash-all.bat is executed
If you think you are having trouble with the adb-tools or getting the right driver check the following article working with adb and fastboot and drivers on your android device.
Hope this helps, please feel free to comment in general or comment for help.

Thanks so much for this. I still can’t get my Nexus 7-2012 to work reliably despite several system updates from “Lollipoop”. It works at times quite well but then inexplicably I’d restart with terrible lags, lock up and even self rebooting. Your instructions are complete but there are many ‘holes’ to someone new to this process. But reading in through and cross indexing it against other sites with a similar focus, yours is the best, and I got done. My old 7 lives again, and despite 4+ years old, the battery is holding on.
A HUGE, HUGE increase in speed with this Nexus 7 (2012 wi-fi) after reverting back to KitKat 4.4.4 from Lollipop 5.1. Flashing sailed thru smoothly except for it not unlocking at step 4 to run bootloader. Add a step (4b), in newer Lollipop you also have to disable “run an external program” from the Developer settings (a couple lines down from “usb-debugging”). The instructions at https://developers.google.com/android/nexus/images#instructions are also quick and helpful.
thanks for your tutorial its is very easy to downgrade Thanks alot
Thank you very much for this great step by step manual. Easy to follow and worked nice:)
Worked perfectly. Many thanks. Breathed a new breath of life back into my old Nexus 7 🙂
Thank you from Brazil!!!
Brilliant I am not tech savy, but followed the instructions and my bricked nexus is back to perfect. Thank you
Thank you very much… (From Seattle)
Hi,
Thank you for your post. I am able to revert my tablet back to 4.4.4.
Important to note, it really need USB 2 in order for it to work. Tried a few times with USB 3, it will randomly failed while writing or reading the ROM. (From Singapore)
yes, USB 3 does not behave as expected
Thanks for the instructions. However, am not getting the option to “Unlock bootloader”.. Trying to downgrade Nexus 7 2012
Thanks for the instructions, have figured out and downgraded successfully.
Thank you for this great tutorial! Saved my day!
Thanks. Nexus 7 is saved :]
Thank you very much for the instructions. I downgraded my extremely slow 2012 Nexus 7 running 5.1.1 back to 4.4.4 and it’s highly responsive again.
Thank you so much! This is a life-savior for my Nexus 7.
Finally get back to 4.4.4 🙂
Great instructions, I now have a usable tablet again. Only comment is that on the unlock bootloader screen you need to press the top button to accept. 🙂
Hi everybody,
During degradering my nexsus 7 2012 from 5.11 to 4.4.4 after Flash.all device had fail “booting failed” now I can do anything. I se only Google text ang Lock bottom of display an left corner on the top “Booting failed”
I have tried many time to reconnect but doesn’t help. There is no connection between tablet and PC. I also tried with power button+wolume down and other kombination, doesn’t work
Powershell can not list adb devices:-(
Any suggestion?
thanks
A huge thank you from India. Found my nexus 2012 in a cupboard and thought what the hell, let me give this a try. Was slow as hell on android 5. Googled and came up to this thread, followed instructions to a T and now I have a responsive tablet again! Just have to switch the battery for better backup I guess. Thanks again. You’re the man (or lady)!
I am glad it worked for you. You are welcome!
I would suggest switching a few things around. In your instructions, you have a line that says:
“If necessary (On the bootloader screen if it says “Lock status – Locked”) , unlock the device’s bootloader by running:”
followed by two images, then
“C:\ADB>fastboot oem unlock”
The order of that section is confusing. It would be less confusing if it was like this:
“If necessary, if on the bootloader screen it says “Lock status – Locked”, unlock the device’s bootloader by running:
C:\ADB>fastboot oem unlock”
then have the images, slightly rearranged, to accommodate the change.
Warm regards.
–Dr. Doug
I manually typed and ran one batch line at a time instead of running the bat file. I got multiple [OKAY] messages on the erasing of the partitions, but then a bunch of fails on loading the bootloader image, shown here:
C:>fastboot flash bootloader bootloader-grouper-4.23.img
sending ‘bootloader’ (2100 KB)…
FAILED (data transfer failure (Unknown error))
finished. total time: 0.024s
I retried the same command line multiple times to see if it was a timing issue, but it still didn’t appear to load the bootloader properly, showing FAILED messages, but with different completion times and a (remote (Timeout)) error, as shown here:
C:>fastboot flash bootloader bootloader-grouper-4.23.img
sending ‘bootloader’ (2100 KB)…
FAILED (remote: (Timeout))
finished. total time: 2.030s
Throwing my hands in the air, bailing out on ever expecting to see an OKAY on that step, I went to the next step, which was the reboot of the bootloader, which failed, but I think it’s giving a clue I can’t decipher:
C:>fastboot reboot-bootloader
rebooting into bootloader…
FAILED (remote: (Nv3pBadReceiveLength))
finished. total time: 0.006s
Pinging appears to work, but continuing on to the updating of the image, I’m getting multiple lines where I’m getting ‘does not contain’ messages:
C:\>fastboot -w update image-nakasi-ktu84p.zip
archive does not contain ‘boot.sig’
archive does not contain ‘recovery.sig’
archive does not contain ‘system.sig’
archive does not contain ‘vendor.img’
Creating filesystem with parameters:
Size: 14569963520
Block size: 4096
Blocks per group: 32768
Inodes per group: 8160
Inode size: 256
Journal blocks: 32768
Label:
Blocks: 3557120
Block groups: 109
Reserved block group size: 871
Created filesystem with 11/889440 inodes and 97309/3557120 blocks
Creating filesystem with parameters:
Size: 464519168
Block size: 4096
Blocks per group: 32768
Inodes per group: 7088
Inode size: 256
Journal blocks: 1772
Label:
Blocks: 113408
Block groups: 4
Reserved block group size: 31
Created filesystem with 11/28352 inodes and 3654/113408 blocks
——————————————–
Bootloader Version…: 4.23
Baseband Version…..: N/A
Serial Number……..: 015d49064d4bf605
——————————————–
checking product…
OKAY [ 0.030s]
checking version-bootloader…
OKAY [ 0.010s]
sending ‘boot’ (4994 KB)…
FAILED (data transfer failure (Unknown error))
finished. total time: 0.598s
The bootloader version correctly shows version 4.23, but the very, very last line fails on sending ‘boot,’ which I wonder what that is, if it’s simply the command to reboot the device. I think I’m pretty close.
Dr. Doug
Read all response messages. If there are any failures, switch USB ports. The Google help forums all say the same things. Not all USB ports are the same. I spent two days attempting to download from a USB port that wasn’t playing well, switched to another, and–surprise–instant success.
Dr. Doug
Are there any Android Lollipop versions that work well on the 2012 Nexus 7, that don’t bog it down? Anyone?
–Dr. Doug
Thanks again from Bulgaria! I resurrected my old tablet – such a fine device to struggle many years from the 5.*.* Android……. Some more notes from me:
1. adb.exe devices – returns “unauthorized” device, I used this to resolve:
https://stackoverflow.com/questions/23081263/adb-android-device-unauthorized
– Revoke USB debugging authorization”
– Restart ADB Server:
2. Although my device was already unlocked, it is a good idea to run “fastboot oem unlock” – because it will confirm that your device is unlocked. In my case I directly ran flash-all.bat, its first command was again:
“fastboot oem unlock” – which returned – FAILED (command write failed (Unknown error))
and then it badly hanged on
earasing ‘boot’ ….
– But after another reboot I tried first only “fastboot oem unlock” to check, and it was OK – returned that my device is already unlocked.
Regards
P.S. you have small punctual mistakes in the text One->Once, fun->run
Remarquable Tutorial. Works like a charm and you saved my Nexus 7 2012.
Thank you for the effort you put in writing this.
Thank you so much. It was very easy to follow the steps you described.
Thanks !! My Nexus has been unusable and thought I would give your instructions a try. It was easy to follow and now I have a Nexus that is responsive again!
Thanks again,
Glenn.
My Nexus tab was terribly slow after i upgraded to 5.1.1, since then i kept it away for 3 years and was not using any more. Recently i thought of using it as my car media entertainment and fortunately i found your instructions as how to degrade the OS. Thank you so much it worked for me … I successfully down graded the android version from 5.1.1 to 4.4.4
Thank you very much.
-Srini
An absolute life saver. Was about to bin my old 7 then thought I’d give this a try. Superb! 7 lives again.
Many, many thanks – star player!