In this tutorial walk you through mounting USB sticks and USB hard drives on your Raspberry Pi running Raspbian. This will enable you to use your external USB storage for anything you wish to. This tutorial is designed to ensure the mount point of the external disk is persistent across reboot and whichever port the USB device is connected to. We shall use disk label to fix the mount point.
If you are looking for a way to mount a USB storage on your Raspberry Pi with a Linux native file system ext4, you can use this article.
Update and upgrade Raspbian to the latest
Before we start we shall ensure that that your raspberry Pi is connected your LAN and Internet, is up to date with the latest packages and distribution:
Login with the id “pi” of is logged in from console check your id with the following command, it should return “pi”
id -un
Update and upgrade
sudo apt-get update -y
sudo apt-get upgrade -y
Optional: Check your os version (just to know which version you are working with)
sudo apt-get install lsb-release
lsb_release -a
Setting up storage
To enable your Raspberry Pi as a network access storage device, the first thing you need to do it attach a storage device, which shall store all the data. You may install a high external USB disk (512GB/1GB) etc. ensure your Raspberry Pi is connected to sufficient power source to power both the external disk and Raspberry Pi. You may also consider powering the external USB disk with a separate power supply, maybe consider using a USB power hub to power the external disk.
Optional
Once you have decided on your storage, format the disk partition you plan to use with fat32 (unless it came preformatted from the factory) and your disk is ready to be installed. As soon as you insert the USB drive, Raspbian on Raspberry Pi will use to automatically mount it as the user logs in. This should automatically mount the device to the following location “/media/[UserID]/[Disk-Label]”
For this tutorial, I used my 32GB pen drive which had a LABEL of 32GB
in this case it automatically mounts to when logged in with the user id “pi”:
/media/pi/32GB
However, this auto mount point can vary based on the user id that logs in. Over reboot it will not mount automatically (i haven’t tested it, inputs please!) unless the user logs in. To avoid, we shall add a fixed mount point by adding an entry to “/etc/fstab” file
Setting up a fixed mount point for the external storage on power on:
first we shall identify the disk and the label. to know the disk Label use the following command
sudo lsblk -f
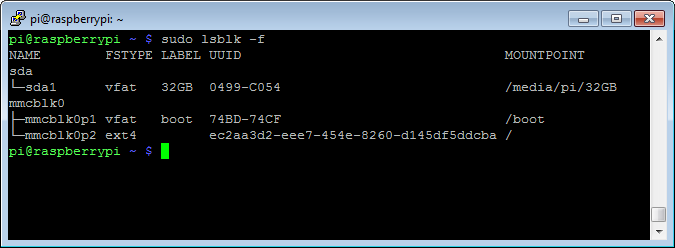
this shall display disk name, label, mount point etc. In this case, the label name is “32GB” Note the Label name. If there is no label of have trouble fixing it, click on this link.
It is likely that this disk drive has already been mounted so we shall check the automatically mounted. Confirm the mount point by running
df

Unmount the automount location by the following command. In this case, the mount point is “/mdedia/pi/32GB”. Update the command as appropriate for your USB device.
umount /media/pi/32GB
Prepare a new location to mount the disk
sudo mkdir /nas
edit the fstab
sudo nano /etc/fstab
Mount entry in the “/etc/fstab” file shall make this mount permanent across reboot. Include the following line to mount the usb drive under the newly create folder, in this case, mount the device with label “32GB” under “/nas” folder by adding the following line. (replace your device label as noted earlier with “32GB”).
As you may already know, when a msdos, fat32 etc. file systems are mounted they inherits the ownership of the file while it gets mounted, therefore we cannot change ownership or the file permission once they are mounted. Therefore. we added two more changes to simplify access for miscellaneous applications to the “/nas” mount point. By default when we are mounting a non unix file system, the user id and group id of all the files inside the mount point is “root” and the umask is “0022”(Owner=rwx, Group=r-x, Other=r-x), By changing the “gid=users” makes the group owner of the files to the group name, “users”. Also by changing the umask to “0002” gives the default user write permission to the file. By making these changes on a Raspbian(on Raspberry Pi), we can potentially allow appropriate service to run as a group member of “users” and have “write” access to any folder inside the mount point “/nas” without requiring to change the files/folder permission.
LABEL=32GB /nas vfat umask=0002,gid=users 0 0

now run
sudo mount -a
the above command shall reload the newly edited /etc/fstab file and execute the new entry and mount your usb disk to “/nas”. To check if the mount was successful fun the following command and observe the output
df

this will display the newly mounted device
Reboot and to check if the external disk is mounted in the new location
sudo reboot
login back to the raspberry pi and run the following command to verify the mount point
df
Now we have assigned a fixed mount point for the external disk drive, which is available under “/nas” directory in our raspberry pi device.
In case, your external connected usb disk takes a long time to initiate this automount might fail and you may need to initiate the system mount at a later time. Adding an entry to /etc/rc.local can do the trick.
sudo nano /etc/rc.localAdd this lines before the exit line
sleep 30
sudo mount -a
exit
Recap
1. Update and upgrade the system
2. Connect the device and identify the device label name
3. Unmount the automatically mounted drive
4. Create the new mount location
5. Add entry to /etc/fstab for mounting the disk drive over reboot using the label name
6. Add automount delay in “/etc/rc.local” file
7. Reboot and check

3 thoughts on “Mounting USB Storage/external disk (FAT file system) on Raspberry Pi for Local or Network storage”